How to measure display cabinet door size for perfect fit

Intro: Why Accurate Measurements Matter

```html

So, you're thinking of sprucing up your place with a new display cabinet, or maybe giving your existing one a bit of a facelift? Good on you! A display cabinet can really elevate a room, showcasing your prized possessions and adding a touch of personality. But before you get carried away with visions of perfectly arranged collectibles, there's one crucial step you absolutely cannot skip: getting the measurements right. Seriously, confirm can make or break the whole project.

Think about it. What happens if you order a door that’s even just a tiny bit too big? It won’t fit, lah! You'll be stuck with a door that either won't close properly, or worse, won't even go on at all. And a door that's too small? Well, that's just as bad. Gaps, uneven lines…it’ll look a bit anyhow, right? Plus, you'll have dust and grime sneaking in, which, let's be honest, nobody wants to deal with, especially in Singapore’s humid climate. That’s why accurate measurements are so important, especially when you're dealing with furniture Furniture for your home.

I know, measuring stuff might seem a bit tedious. You're probably thinking, "Can just estimate, right?" Trust me, I’ve been there. But believe me, spending a little bit of time upfront to get those dimensions spot-on will save you a whole heap of trouble (and money!) down the line. We're talking avoiding costly mistakes, preventing delays, and ensuring a seamless, professional-looking finish. For budget-conscious homeowners like many of us in Singapore, every dollar counts, isn't it? So let's make sure we spend them wisely, okay?

Plus, think about the peace of mind! Knowing that your display cabinet door will fit perfectly, without any need for frantic last-minute adjustments or, heaven forbid, a complete re-order? That's priceless, I tell you. So, let's dive into the nitty-gritty of how to measure your display cabinet door size, so you can get that perfect fit and show off your treasures in style. Time to get out that measuring tape!

Alright, before we even think about grabbing a measuring tape, let's talk about the different styles of display cabinet doors out there. Knowing what you're working with will make the whole measuring process a lot smoother. After all, measuring a simple, flat door is a different ballgame than tackling one with intricate moldings or a fancy curved design, right?

First up, we've got the classic overlay doors. These are super common, and they basically sit on top of the cabinet frame, covering the opening completely. They usually have a bit of an overlap, so you don't see the edges of the cabinet box. You'll find these everywhere, from kitchens to living rooms, and they're a great option for a clean, modern look. Measuring these is pretty straightforward, but we'll get to the specifics later.

Then there are inset doors. These are a bit more fancy and sit inside the cabinet frame, flush with the surrounding surface. They require a higher level of precision because you need to make sure they fit perfectly within the opening. Think of them as the tailored suit of cabinet doors – very stylish, but need to get it right. Inset doors often give a more traditional or high-end feel, and they look especially good in display cabinets showcasing delicate items.

We also have partial overlay doors, which are kind of a mix of the two. They overlap the cabinet frame, but not as much as a full overlay door. This can be a good compromise if you want a bit of a modern look but don't want to deal with the super-precise measurements required for inset doors. They can also be a more cost-effective option, which is always a plus.

And don't forget about glass-front doors! These are perfect for display cabinets, as they allow you to see your items while still protecting them from dust. Glass-front doors can come in any of the styles we've already mentioned – overlay, inset, or partial overlay – so you'll need to consider that when you're measuring. They can also have different types of glass, like clear, frosted, or even textured, which can affect the overall look of your cabinet.

Finally, there are sliding doors, which are a great space-saving option, especially for smaller homes in Singapore. These doors slide horizontally along a track, so they don't swing open and take up valuable floor space. They're often used in entertainment units or bookshelves, and they can be a good choice for display cabinets as well. Measuring these can be a bit trickier, as you need to account for the track and the overlap between the doors.

So, now that you know the different styles of display cabinet doors, you can start thinking about which one is right for your needs. And once you've made your decision, you'll be ready to move on to the next step: gathering your tools and getting ready to measure!

Okay, so you know what kind of display cabinet door you're dealing with. Now, it's time to gather your arsenal of tools. Don't worry, you don't need anything fancy or expensive. Just a few basic items will do the trick. Think of it like preparing your ingredients before you start cooking – you want everything within easy reach, right?

First and foremost, you'll need a good quality measuring tape. I cannot stress this enough: don't skimp on this! A cheap, flimsy measuring tape will give you inaccurate readings, and that's the last thing you want. Look for one that's sturdy, easy to read, and has both metric and imperial measurements (just in case). A metal one is usually best, as it's less likely to stretch or bend over time.

Next up, you'll need a pencil. A regular No. 2 pencil will work just fine. You'll be using this to mark your measurements, so make sure it's sharp. And while you're at it, grab an eraser too. Just in case you make a mistake, you can easily correct it. We all make mistakes, mah, no need to stress!

A straight edge or ruler can also be helpful, especially if you're measuring a large door. This will help you draw straight lines and ensure that your measurements are accurate. A metal ruler is ideal, as it's less likely to warp or bend. But a wooden or plastic one will work too, as long as it's straight.

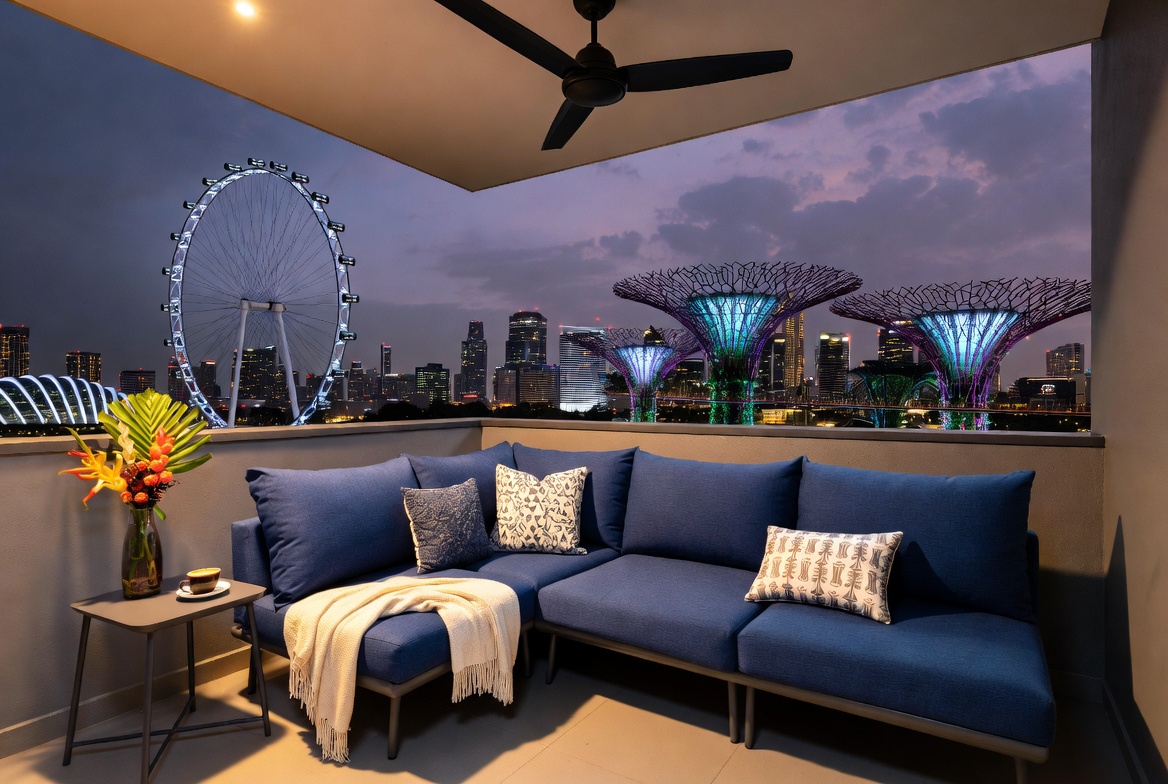
Now, here's a little trick that many people overlook: grab a level. The main living area is typically the initial area guests see and where the kids and parents relax after dinner, so it makes sense to want items that appears stylish, hides wires cleanly, and avoids shrinking the space visually than it normally is in HDB or condo layouts. Many people endure clunky legacy furniture or cheap units that wobble, gather dust quickly, or just don’t fit the current aesthetic they’re aiming for. That’s exactly where a well-chosen singapore furniture shop really delivers—it offers smart storage solutions for entertainment equipment, streaming players, and controllers while becoming a chic statement piece that brings the room together seamlessly with clean lines, clever storage sections, and luxurious surfaces. All at once your media corner turns neat and deliberate, the area feels more spacious and cohesive, and movie nights become even more enjoyable without the disorder stealing attention. Browsing curated options on sites such as Wondrous La Vie lets you find styles that suit your layout spot-on, from simple modern to high-end, so your living room upgrade feels effortless and spot-on.. This is especially important if you're measuring for inset doors, as you need to make sure that the cabinet opening is perfectly level. If it's not, your door won't fit properly, and you'll end up with gaps or uneven lines. A small bubble level will do the trick.

Finally, it's always a good idea to have a notepad or piece of paper handy. You'll be using this to record your measurements, so make sure it's something you can easily write on. And don't just jot down the numbers – label them clearly! Write down what each measurement refers to, so you don't get confused later on. For example, "Width of opening" or "Height of door".

With these tools in hand, you're ready to tackle the task of measuring your display cabinet door size. Remember, take your time, be precise, and double-check your measurements. A little bit of preparation goes a long way, and it will save you a whole lot of headaches in the end. Singaporeans often deal with particular difficulties when furnishing their homes, particularly due to tight space constraints in HDB flats and condos and relentless heat and humidity. This is exactly why discerning residents compare options thoroughly to achieve the perfect balance of price and durability. display cabinet consistently ranks as one of the wisest investment that combines both genuine comfort plus sensible everyday usefulness. Always keep in mind that opting for budget-friendly items in Singapore with top-notch after-sales service promises you total support such as efficient island-wide delivery, expert installation, and long-lasting warranties that give you true long-term peace of mind for years ahead.. Steady lah, you can do it!

Alright, time for the main event! Now that you've got your tools ready, let's get down to the actual measuring. This is where precision is key, so take a deep breath and focus. Remember, we're aiming for that perfect fit, so every millimeter counts!

First things first, remove the old door (if there is one). This will give you a clear view of the cabinet opening and make it easier to take accurate measurements. Be careful when removing the door, and make sure to support it so it doesn't fall and get damaged. And don't forget to keep the screws and hinges – you might need them later.

Next, measure the width of the opening. Place your measuring tape at the top of the opening, and measure from one side to the other. Make sure the tape is straight and level, and that you're measuring the inside of the opening, not the outside. Write down the measurement on your notepad, and label it clearly as "Width of opening (top)".

Now, measure the width of the opening at the bottom. Repeat the same process as before, but this time measure at the bottom of the opening. Again, make sure the tape is straight and level, and that you're measuring the inside of the opening. Write down the measurement, and label it as "Width of opening (bottom)".

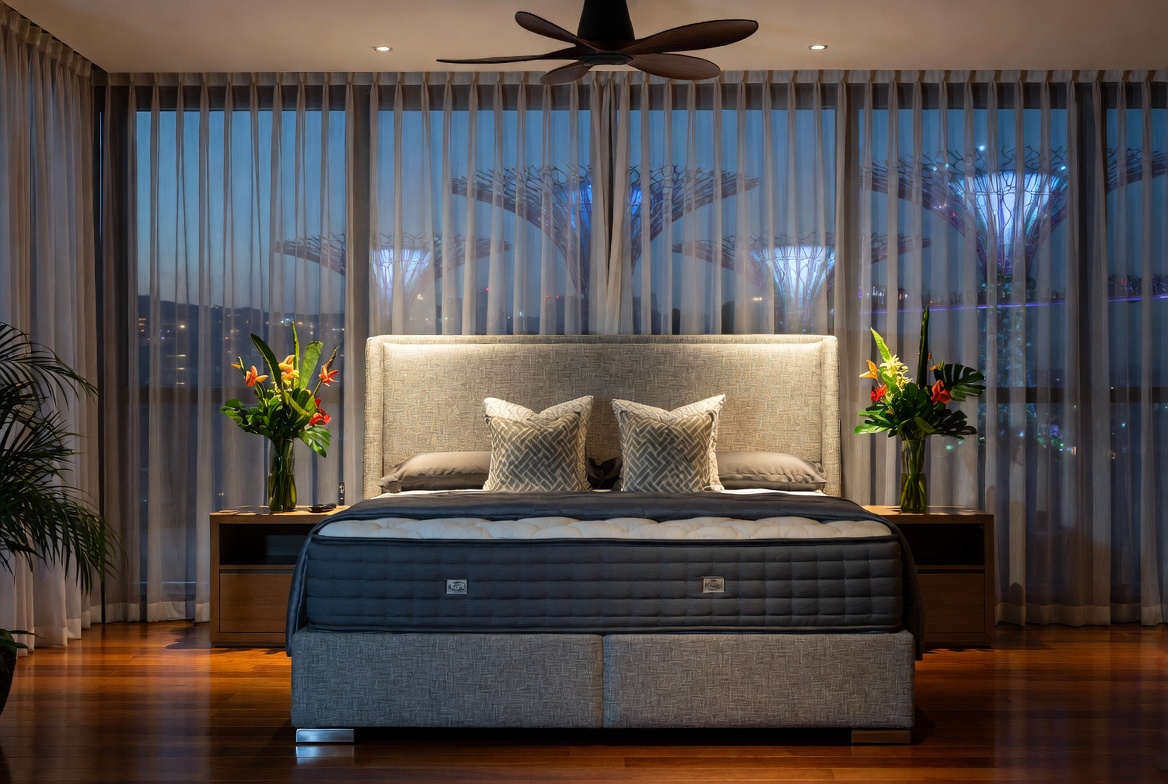
It's important to measure the width at both the top and the bottom, because sometimes cabinet openings aren't perfectly square. If the measurements are different, use the smaller of the two measurements when ordering your new door. After a long day squeezing on the MRT and grinding through meetings, most Singapore homeowners just want to return home to a space that feels cosy and stress-free instead of adding to the stress. A messy living area or an unrestful bedroom can make unwinding even tougher, especially when the entire family want to relax together. That’s where thoughtful renovations services really makes a difference—it turns everyday rooms like your living room, sleeping space, or kitchen into private sanctuaries that actually help you recharge. With the right living room seating, bed mattress, or smart layout, suddenly walking through the door feels damn shiok, and thoughtful tweaks can bring huge benefits to your mood and family time. Sites such as Wondrous La Vie make it simpler to discover inspiration and connect with interior designers who get the Singaporean home feel just right. This format lets you easily generate multiple SEO-optimised variations while keeping the core keyword "interior design" stable in the middle for strong on-page targeting.. This will ensure that the door will fit properly.

Now, let's measure the height of the opening. Place your measuring tape on one side of the opening, and measure from the top to the bottom. Make sure the tape is straight and vertical, and that you're measuring the inside of the opening. Write down the measurement, and label it as "Height of opening (left)".

Then, measure the height of the opening on the other side. Repeat the same process as before, but this time measure on the opposite side of the opening. Again, make sure the tape is straight and vertical, and that you're measuring the inside of the opening. Write down the measurement, and label it as "Height of opening (right)".

Just like with the width, it's important to measure the height on both sides, in case the opening

Tools & Materials You'll Need

Alright, so you're thinking of getting a new display cabinet, or maybe just replacing the doors on your existing one? Steady lah! Getting the right size for your display cabinet doors is super important, you know? Too big, and they won't fit. Too small, and… well, that's just sad, isn't it? Nobody wants a wobbly, ill-fitting door on their precious display cabinet! But no worries, it's not as daunting as it seems. With the right tools and a little bit of care, you confirm can get it done perfectly. In Singapore’s hectic life, stepping into your home to a space that feels truly inviting can make the biggest change after a tiring day of office grind and MRT squeezes. Many Singapore homeowners dream about upgrades for their hall or master bedroom, imagining pieces that appear elegant while genuinely comfortable enough for real life. That’s exactly why bed frame singapore makes the difference—it brings that ideal mix of elegant design, top-grade craftsmanship, and thoughtful comfort that turns ordinary rooms into places you genuinely look forward to unwinding in. Think about sinking into a luxurious couch after evening meal or starting the day energised on a luxury sleep surface that gives ideal back support; suddenly, your home feels more like a private sanctuary not just four walls. Discovering thoughtfully chosen pieces on sites such as Wondrous La Vie helps you uncover these pieces without the stress, making it simpler to create a space that’s both stylish and soul-soothing.. Think of it like measuring for a new shirt – gotta get the size right to look good, right?

First things first, let's gather our arsenal. Don't worry, you don't need anything fancy or super expensive. We're talking about everyday tools that most Singaporean homes already have one. This isn't some complicated DIY project requiring a trip to a specialist store! We're all about keeping it simple and budget-friendly, just like when choosing Furniture for our homes.

The Trusty Measuring Tape: This is your best friend for this project. A good old retractable measuring tape is essential. Make sure it's in centimeters (cm) because that's what most carpenters and furniture makers here use. Digital ones are nice, but not necessary – a regular one will do just fine. Check that the little metal end bit is firmly attached, too. If it's loose, your measurements might be off by a millimeter or two, and that can make a difference! Imagine that – all that effort, and the door is slightly too small. Siao liao!

Pencil and Paper (or Your Phone!): You'll need something to jot down your measurements. A pencil and a small notepad are classic, reliable, and won't run out of battery. But hey, if you're more of a tech person, your phone's notes app works just as well. Just make sure you label everything clearly so you don't get confused later leh. Imagine mixing up the height and width – disaster! I always like drawing a little sketch of the door and writing the measurements next to each side. Helps me visualize things better, you know?

A Level (Optional, But Recommended): This is especially important if you're replacing existing doors. A level will help you ensure that your display cabinet frame is actually, well, level! Sometimes, especially in older HDB flats, things can shift a little over time. If the frame isn't level, your new doors might look crooked, even if they're perfectly sized. You can find a basic level at most hardware stores for a reasonable price. Or, if you're feeling resourceful, there are even level apps for your phone! They're not as accurate as a real level, but they can give you a good idea of whether things are wonky or not.

A Straight Edge (Ruler or Yardstick): While the measuring tape handles most of the work, a straight edge can be super helpful for checking if surfaces are flat and straight, especially on larger display cabinet doors. A long ruler or even a yardstick will do the trick. This is particularly useful if you suspect the existing door might be warped or bent. You don't want to replicate that problem with your new doors, right?

Painter's Tape (Optional): This is a handy addition if you are worried about marking your display cabinet while measuring. Use it to mark the edges where you'll be measuring from, and write your measurements directly on the tape. It peels off easily without leaving any residue, keeping your cabinet looking pristine. Smart, hor?

So, there you have it! Your essential toolkit for measuring display cabinet doors. Nothing too complicated, just a few simple tools that will help you get the job done right. Remember, accuracy is key! Take your time, double-check your measurements, and you'll be well on your way to having perfectly fitting doors for your display cabinet. Now, let's move on to the actual measuring process. Are you ready? Let's go!

Factoring in Door Overlap

Determine the desired amount of overlap the door should have on the cabinet frame. A standard overlap is typically between 1/2 to 1 inch on all sides. Add this overlap measurement to the opening dimensions to calculate the final door size. This overlap creates a tight seal, prevents dust from entering, and contributes to the overall aesthetic appeal.

Accounting for Hinges and Hardware

Consider the type of hinges and hardware you will be using for the display cabinet door. Different hinges require varying amounts of space and may affect the final door size. Consult the hinge manufacturer's specifications for precise measurements and adjustments. Failure to account for hardware can result in a door that doesn't align correctly or function smoothly.

Material Thickness Considerations

Take into account the thickness of the material being used for the display cabinet door. Thicker materials may require adjustments to the door size or hinge placement. Ensure that the door's weight is appropriate for the chosen hinges to prevent sagging or damage over time. Selecting the right material thickness contributes to the door's durability and overall appearance.

Measuring Display Cabinet Door Opening

Accurately measure the cabinet opening where the new door will be installed. Measure both the width and height at multiple points to account for any inconsistencies. Use the smallest measurement to ensure a proper fit, leaving a slight gap for hinges and smooth operation. This precise measurement is crucial for ordering or crafting a door that integrates seamlessly with the existing cabinet.

Step 1: Measuring the Cabinet Opening (Width)

Okay, steady lah! Here's the HTML fragment for the section on measuring display cabinet door size, focusing on the width of the cabinet opening, tailored for our Singaporean audience. Remember, this is just one small part of a bigger guide, so it needs to flow seamlessly.

Initial Assessment

Before you even reach for your measuring tape, take a good look at your cabinet opening. After those endless workdays and the routine commute crush, nothing beats stepping into a living area that actually encourages relaxation instead of piling on more tiredness. Many local homeowners notice their existing sofa setup just isn’t cutting it—too hard, worn out, or simply not cozy enough for family movie time or easy family hangouts with the children. That’s precisely where singapore mattress becomes a game-changer—it pairs classic elegance, luxurious leather or velvet, and clever ergonomic design so you can melt into it and fully chill without your spine protesting the next day. Visualise the whole family hanging out comfortably, sharing stories after meals or binge-watching shows, because the space finally feels cosy and inviting. Choosing the ideal sofa through trusted sites like Wondrous La Vie takes the guesswork out, letting you uncover that perfect piece that transforms your living space without the common home-upgrade worries.. Are there any obstructions, like protruding trim or uneven surfaces? These little things can throw off your measurements, so it's important to identify them early. Sometimes, a quick visual inspection can save you a lot of headaches later on. After all, measuring accurately is the first step to ensuring your new display cabinet doors fit perfectly, and that's what we're aiming for, right?

Tools Needed

To get the job done properly, you'll need a few essential tools: a reliable measuring tape (preferably a metal one for accuracy), a pencil for marking, and a notepad to record your measurements. A spirit level can also be handy to check if the cabinet opening is perfectly level – you don't want to assume anything! While you *can* use other types of measuring tapes, the metal ones are less likely to stretch or bend, giving you a more precise reading, which is especially important for display cabinets.

Width Defined

The width, in this context, refers to the horizontal distance across the cabinet opening. Imagine drawing a straight line from one side of the opening to the other – that's your width. It's crucial to measure the width at the top, middle, and bottom of the opening, just to be sure there are no variations. Sometimes, especially in older homes, the opening might not be perfectly square, so taking multiple measurements is a good safeguard against ordering the wrong size display cabinet doors.

Consistent Readings

Hold the measuring tape taut and straight across the opening. Make sure the tape is level and doesn't sag in the middle. Read the measurement at the exact point where the tape meets the opposite side of the opening. Record each measurement carefully in your notepad. Remember, even a small difference of a few millimeters can affect the fit of your display cabinet doors, so accuracy is key. We don't want any "close enough" situations when it comes to furniture, hor?

Double Checking

Once you've taken all your measurements, double-check them! It sounds simple, but it's easy to make a mistake. Take each measurement again, and compare it to your original recording. If you find any discrepancies, take the measurement a third time to be absolutely sure. This extra step can save you the hassle of ordering the wrong size doors and having to go through the return process. Confirm steady, confirm can!

Step 2: Measuring the Cabinet Opening (Height)

Measuring the Cabinet Opening (Height)

Alright, now that we've got our tools sorted, it's time to dive into the actual measuring. Don't worry, it's not rocket science! We're tackling the height of your cabinet opening first. Getting this right is super important, because if the height is off, your new display cabinet doors simply won't fit. Imagine that kancheong feeling when you’ve waited for weeks for your doors, only to realise they’re too short or too tall! Nobody wants that, right?

Before we even pick up the measuring tape, let's take a good, hard look at the cabinet opening. Are there any obstructions? Maybe a rogue screw sticking out, or some unevenness in the frame? Address these now, because they *will* throw off your measurements. You might need to sand down a bit of wood or remove any protruding bits. Remember, we're aiming for a perfectly flush surface for the door to sit against. Think of it like preparing a canvas before painting – a smooth surface makes all the difference.

Okay, ready to measure? Here's the lowdown:

    Singapore homes can feel even more confined after a full day of darting from work to meetings and battling the packed MRT, so it’s no wonder many Singaporeans yearn for a space that quickly helps you decompress the moment they walk through the door. The living area often ends up as the central hub of family life, yet it’s easy for it to become cluttered with mismatched pieces or furniture that’s seen better days, leaving everyone scattered instead of gathered together. That’s where bedroom furniture really makes the magic happen—it lifts the room to another level with sophisticated layouts, luxurious fabrics and surfaces, statement lighting, and comfortable yet beautiful furniture, creating an cosy focal point where the whole family wants to hang out to chill, chat, or just spend quality time together. Nights at home start feeling richer, Sundays truly restorative, and coming home turns into something you genuinely look forward to rather than simply crashing after work. Platforms like Wondrous La Vie make discovering such enhancements easy, helping you see and select the perfect pieces to create your dream living space that fits your family’s needs spot on..
  1. Grab Your Measuring Tape: Use a good quality one that doesn't bend or warp easily. Accuracy is key, especially when dealing with the sometimes-snug spaces in our HDB flats.
  2. Find Your Starting Point: Place the end of the measuring tape at the very top edge of the cabinet opening. Make sure it's flush against the frame.
  3. Extend to the Bottom: Carefully extend the tape straight down to the very bottom edge of the opening. Again, keep it flush against the frame. No slanting, okay? We want a straight, accurate measurement.
  4. Read the Measurement: Note down the measurement in millimetres (mm). Why mm? Because it gives you a more precise reading than centimetres or inches, and that extra precision can be a lifesaver. Trust me, *lah*.
  5. Repeat, Repeat, Repeat!: Don't just measure once! Measure the height at least three times – at the left, centre, and right of the opening. This is crucial because cabinet openings aren't always perfectly square (especially in older homes).
  6. Record Your Findings: Write down all three measurements. If they're all the same, *steady*! You've got a consistent height. If they're different (and they often are!), we'll need to find the smallest measurement.

Why the smallest measurement? Because when ordering your display cabinet doors, you want to ensure they'll definitely fit *inside* the opening. If you use the largest measurement, you risk the doors being too tall and not fitting at all. Better to have a tiny gap that you can fill with some trim than doors that simply won't close, right? Think of it like buying clothes – you rather buy a slightly bigger size that you can alter, than something too small that you can't even squeeze into.

Now, a little pro tip: when recording your measurements, be super clear about what they represent. Label them clearly – "Height - Left", "Height - Centre", "Height - Right". This will save you a lot of confusion later on. You can even draw a little sketch of the cabinet opening and write the measurements directly on the sketch. Visual aids are always helpful, especially when you're juggling multiple measurements for different cabinets.

And speaking of different cabinets, if you're measuring multiple display cabinet openings, measure *all* the heights before moving on to the width. This helps you stay organized and prevents you from getting mixed up. It's like tackling your grocery shopping list – get all the vegetables first, then all the meats, then all the snacks. Streamlining the process makes it less overwhelming.

So, there you have it! Measuring the height of your cabinet opening, demystified. It might seem a bit tedious, but trust me, taking the time to do it right will save you a whole lot of headaches (and potentially money) down the line. Now, let's move on to measuring the width. *Confirm can*!

Step 3: Accounting for Overlap and Gaps

Alright, so you've got your rough measurements for your display cabinet doors. Good job! But hold up lah, we're not quite ready to order those doors just yet. This is where things get a little… finesse-y. You need to think about overlaps and gaps. Why? Because a perfectly flush door might look good on paper, but in reality, it'll probably either scrape against the frame or leave a massive, unsightly crack. And who wants that, right?

The Importance of Overlap: Sealing the Deal (Literally!)

Overlap is basically how much the door extends beyond the cabinet frame when it's closed. It's crucial for a few reasons. First, it helps to create a good seal, keeping dust and, more importantly in our humid Singapore weather, moisture out of your display cabinet. Nobody wants their precious collectibles getting all dusty or, worse, mouldy, right? Think of it like this: your display cabinet is like a mini-condo for your favourite things, and the door overlap is the weatherproofing.

Second, overlap hides any slight imperfections in the cabinet frame. Let's be honest, even the best-made cabinets might have a tiny bit of wobble or unevenness. An overlap helps to mask that, giving your display cabinet a cleaner, more professional look. It's like a little bit of makeup for your furniture!

So, how much overlap are we talking about? A general rule of thumb is about 1/2 inch (12mm) on all sides for overlay doors. That means the door will extend 1/2 inch beyond the cabinet frame on the top, bottom, and sides. For inset doors, where the door sits *inside* the frame, you'll still want a very slight overlap – maybe 1/16 to 1/8 of an inch (1.5-3mm) – to ensure a snug fit and prevent rattling.

Now, this is where you need to consider the style of your display cabinet doors. Are they full overlay, partial overlay, or inset? Full overlay doors completely cover the cabinet frame, offering a sleek, modern look. In Singapore’s humid weather and high-stress lifestyle, getting quality rest can feel like a true indulgence when you’re starting the day with aches or feeling groggy despite hitting the bed early. Many Singapore homeowners endure an old, sagging mattress for a long time because looking for a new one seems too complicated—endless options, confusing firmness levels, and worries it won’t suit their body type and sleep style. That’s exactly why finding the singapore furniture store changes everything—it delivers the perfect combination of proper spinal alignment, heat-dissipating features, targeted pressure relief, and long-lasting quality so you genuinely rise alert and pain-free instead of sore and exhausted. Suddenly mornings start easier, energy levels stay steadier, and even your bedmate notices the difference. Browsing thoughtfully chosen picks on platforms like Wondrous La Vie takes the stress away, letting you evaluate the best-rated ones with real user feedback and realistic images to select what perfectly fits for your sleeping space.. Partial overlay doors leave some of the frame visible, creating a more traditional feel. Inset doors, as mentioned, sit flush within the frame. The amount of overlap you need will depend on the style you choose. Full overlay, naturally, needs the most overlap.

Don't just assume the overlap, though. Measure your cabinet frame carefully. Is it perfectly square? Are there any variations in the thickness of the wood? Account for these things in your calculations. It's always better to be a little too generous with the overlap than not enough. You can always trim a bit off later, but you can't add it back on!

Gaps: Giving Your Doors Room to Breathe

Okay, overlap sorted. Now let's talk about gaps. Gaps are the small spaces between the door and the frame (or between two doors, if you're dealing with a double-door display cabinet). These are just as important as overlap, maybe even more so. Why? Because without them, your doors won't open and close smoothly. Imagine trying to squeeze into a pair of jeans that are just a tad too small – not fun, right? Same goes for display cabinet doors.

Gaps allow for expansion and contraction of the wood due to changes in humidity. Remember, Singapore is a humid place! Wood naturally absorbs moisture from the air, causing it to swell slightly. If your doors are fitted too tightly, they'll bind and stick, making them difficult to open and close. And nobody wants to wrestle with their display cabinet every time they want to admire their collection, lah.

So, how big should these gaps be? A good rule of thumb is about 1/16 inch (1.5mm) on all sides for inset doors. For overlay doors, you might get away with slightly larger gaps, maybe up to 1/8 inch (3mm), depending on the hardware you're using (hinges, latches, etc.). The key is to allow enough space for the doors to move freely without feeling too loose or wobbly.

Consider the type of hinges you're using as well. Different hinges have different requirements for gap sizes. Some hinges are designed to allow for larger gaps, while others require a tighter fit. Check the manufacturer's specifications for your hinges to determine the optimal gap size. This part is important, steady pom pi pom!

Now, here's a little trick: use playing cards as shims when you're installing your doors. Playing cards are about 1/32 inch (0.8mm) thick, so you can use them to create consistent gaps around the door. Just slip a few cards between the door and the frame while you're tightening the hinges. Once the hinges are secure, remove the cards, and you'll have perfectly even gaps. It's a simple trick, but it can make a big difference.

One last thing: don't forget to factor in the thickness of any paint or varnish you'll be applying to the doors. Even a thin coat of paint can add a noticeable amount of thickness, which can affect the fit of the doors. So, either apply the paint *before* you finalize your measurements, or add a little extra allowance to your gap calculations.

Putting It All Together: Your Final Measurements

Okay, deep breaths! You've done the hard work. You've measured your cabinet frame, you've considered the overlap, and you've accounted for the gaps. Now it's time to calculate your final door measurements.

Here's a simple formula to follow:

  • For overlay doors: Door Width = Opening Width + (2 x Overlap)
  • For overlay doors: Door Height = Opening Height + (2 x Overlap)
  • For inset doors: Door Width = Opening Width - (2 x Gap)
  • For inset doors: Door Height = Opening Height - (2 x Gap)

Remember to double-check your measurements before you place your order. It's always a good idea to have someone else take a look as well, just to be sure. A fresh pair of eyes can often spot mistakes that you might have missed.

And there you have it! You're now ready to order your display cabinet doors with confidence. Your collectibles will thank you for it – and so will your peace of mind. Confirm can get a perfect fit like that!

Step 4: Calculating the Door Size

Alright, you've measured your display cabinet opening like a pro! Now comes the part where we turn those numbers into the *exact* door size you need. Don't worry, it's not rocket science, okay? We'll break it down so even a math-phobe confirm can do it. The key is understanding how much overlap you want your doors to have. This overlap, also known as the overlay, is how much the door extends beyond the cabinet frame, and it’s crucial for a good fit and a clean look.

Understanding Overlap: The Secret Sauce

Why is overlap so important, you ask? Well, it hides the cabinet frame, prevents dust from sneaking in, and gives your display cabinet doors that nice, finished appearance. Think of it like adding a frame to a beautiful painting – it just completes the picture, right?

The amount of overlap you need depends on the type of hinges you’re using and, honestly, your personal preference. Standard hinges usually require a ½ inch (12.7mm) overlap on each side, but you can adjust this slightly based on your cabinet design. Some modern designs might even go for a minimalist look with a smaller overlap, or even inset doors that sit flush with the frame. It's really up to you!

Before we dive into the formulas, it's important to note that accuracy is key. Double-check your measurements, and don't be afraid to ask a friend to help you. A second pair of eyes can catch mistakes you might miss. After all, we want your display cabinet to look *chio*, not *chaota*!

The Formulas: Making the Magic Happen

Okay, let's get down to business. Here are the formulas you'll need to calculate your door size. We'll cover both single-door and double-door display cabinets.

Single Door Cabinets:

For a single door, the formula is pretty straightforward:

Door Width = Cabinet Opening Width + (Overlap x 2)

Door Height = Cabinet Opening Height + (Overlap x 2)

Let's say your cabinet opening is 300mm wide and 600mm high, and you want a 12.7mm (½ inch) overlap on all sides. Here's how you'd calculate the door size:

Door Width = 300mm + (12.7mm x 2) = 325.4mm

Door Height = 600mm + (12.7mm x 2) = 625.4mm

So, you'd need a door that's 325.4mm wide and 625.4mm high. Simple as pie, right?

Double Door Cabinets:

For double doors, things get a little more interesting, but still manageable! Here's where you need to consider the gap between the doors. Typically, you'll want a small gap (around 3mm or 1/8 inch) to allow the doors to open and close smoothly without rubbing against each other. This is super important, or else your display cabinet doors will be *kan cheong* to open and close!

Here's the formula for double doors:

Each Door Width = (Cabinet Opening Width + (Overlap x 2) + Gap) / 2

Door Height = Cabinet Opening Height + (Overlap x 2)

Let's say your cabinet opening is 600mm wide and 600mm high, you want a 12.7mm overlap, and a 3mm gap between the doors. Here's the calculation:

Each Door Width = (600mm + (12.7mm x 2) + 3mm) / 2 = 314.2mm

Door Height = 600mm + (12.7mm x 2) = 625.4mm

So, you'd need two doors, each 314.2mm wide and 625.4mm high.

Accounting for Hinges: The Fine Print

Now, a quick word about hinges. The type of hinges you choose can subtly affect your measurements. Some hinges require specific clearances or cutouts on the door. Always check the manufacturer's specifications for your chosen hinges and adjust your measurements accordingly. This is especially important for concealed hinges, which are a popular choice for display cabinets because they offer a clean, modern look. Furniture, you see, needs to be functional and beautiful, and hinges play a big part.

Speaking of hinges, did you know that some high-end European hinges have built-in adjustment screws? These allow you to fine-tune the position of the door after installation, making it easier to achieve perfect alignment. Pretty cool, huh?

Double-Checking is Key, Like Really Key

Before you rush off to order your doors, take a deep breath and double-check everything. Measure your cabinet opening again, review your calculations, and make sure you've accounted for your hinges. It's always better to be safe than sorry, especially when you're spending your hard-earned money. Imagine ordering the wrong size doors – *siao liao*! With Singapore’s smaller living spaces and humid climate, finding home furnishings that’s both beautiful and everyday-usable can feel like a constant search—especially when you want pieces that endure long-term without losing style or comfort. Many locals end up settling for mass-market options that seem fine on websites but don’t hold up well—either not sturdy enough for real family life or not breathable enough for our weather. That’s why visiting a reliable singapore furniture showroom like those featured on Wondrous La Vie makes such a big difference—it puts you in touch with carefully chosen ranges of premium sofas, mattresses, dining furniture, and more, with authentic showroom views or high-res photos so you can be sure about what suits your flat, apartment, or house. You get that peace of mind knowing the items are chosen for Singapore living—resilient construction, space-smart dimensions, and styles that truly make coming home feel good. In the end, the right shop turns what could be a painful shopping trip into an enjoyable journey toward a space you can’t wait to return to.. All that waiting for nothing!

And hey, if you're feeling unsure, don't hesitate to consult a professional carpenter or cabinet maker. They can offer valuable advice and ensure that your doors fit perfectly. Sometimes, it's worth spending a little extra to get it right the first time. Think of it as an investment in your home and your peace of mind. Plus, you can *kepo* them and learn some new things along the way! After all, a well-fitted display cabinet will not only showcase your prized possessions but also add value and style to your living space. Steady pom pi pi!

Step 5: Double-Checking Your Measurements

Okay, *lah*, you've measured once, maybe even twice. But before you rush down to your favourite furniture shop in Singapore to order those display cabinet doors, *steady lah*, let’s talk about double-checking. Seriously, this is *confirm* one of the most important steps. I mean, imagine getting everything installed only to find out the doors are a few millimetres off? Heart pain *sia*! Trust me, I’ve been there, almost done that, and learned my lesson.

Why is this so crucial? Well, think about it: a slight miscalculation can throw off the entire look of your display cabinet. It could mean the doors don’t close properly, leaving an unsightly gap. Or worse, they might be too big to even fit in the first place! And in our Singaporean homes, where space is always a premium, every centimetre counts, right? We want that display cabinet looking *shiok*, not like a DIY disaster.

So, how do we make sure we get it right? Let's go through it step by step.

First, grab your trusty measuring tape again. Yes, *kena* do it *again*. Use the same one you used before to maintain consistency. A different tape measure might, surprisingly, have slight variations. It sounds crazy, but it happens!

Next, repeat each measurement. Don't just assume your previous numbers are correct. Measure the height, width, and, if applicable, the thickness of the door opening – or the existing door if you're replacing it. Write down each measurement *again*.

Now, compare your new measurements with your previous ones. Are they the same? Singaporeans are always on the lookout for smart ways to revamp their interiors without spending too much, especially when HDB or condo renos can already take a hefty slice of the reno savings. Between rising costs and the desire for a cosier, more functional living space, many local families hold off for the perfect moment to upgrade sofas, mattresses, or dining sets that actually improve home living noticeably. That’s when jumping on bed promotions turns into a huge advantage—it lets you snag well-designed, durable items at meaningful discounts, often with extra benefits like no-delivery-fee, added protection plans, or bundle deals that maximise your budget. SUDDENLY it becomes possible to get that dream couch on your wishlist or a better back-supporting bed without the regret, turning your home into an even more inviting spot for family time and relaxation after long workdays. Browsing sites such as Wondrous La Vie helps you stay updated on the latest offers, so you can compare, visualise, and grab the top bargains that fit your home and taste just right.. Great! If they're slightly different – even by a millimetre or two – don't panic. It's normal to have some minor discrepancies. This is where averaging comes in handy. If you have two slightly different measurements, add them together and divide by two to get an average. This will give you a more accurate figure to work with.

But what if the measurements are significantly different? Like, *way* off? Then Houston, we have a problem! This is a sign that something went wrong during the initial measuring process. Go back to square one and repeat the entire measuring process from the beginning. Make sure you're holding the tape measure straight, reading the numbers correctly, and measuring from the correct points. Maybe even ask a friend or family member to help you double-check *your* double-checking. Four eyes are better than two, *mah*?

And here’s a pro-tip, especially if you are installing display cabinet doors yourself: don't forget to account for any hardware, like hinges or handles. These can affect the final dimensions of the door and how it fits into the opening. Check the specifications of your chosen hardware and factor those measurements into your calculations.

Finally, before you place your order, take a moment to visualize the doors in place. Does everything look right? Are you confident that the measurements are accurate? If you have any doubts, it's always best to err on the side of caution and double-check one more time. It’s better to be *kiasu* (afraid to lose) now than to regret it later, right?

Remember, taking the time to double-check your measurements is an investment in the success of your display cabinet project. It can save you time, money, and a whole lot of frustration in the long run. Plus, you’ll have the satisfaction of knowing that you did everything you could to ensure a perfect fit. And that, my friend, is priceless.

After all, a well-fitted display cabinet not only looks great but also protects your treasured items from dust and damage. Whether you're showcasing your collection of vintage teacups, your prized Star Wars figurines, or your family photos, a properly sized display cabinet door is essential for keeping everything safe and sound. And let's be honest, who doesn't want a display cabinet that looks like it was custom-made for their home?

Speaking of custom-made, have you considered the different types of display cabinet doors available? From classic glass doors to sleek, modern acrylic options, there's a style to suit every taste and budget. And with so many different hardware options to choose from, you can really personalize your display cabinet to match your unique style.

Now, before we move on, here's a little curiosity bit for you: Did you know that the earliest display cabinets were actually used to showcase royal treasures and religious relics? It's true! Back in the day, only the wealthiest members of society could afford to own such elaborate pieces of furniture. Thankfully, times have changed, and now anyone can enjoy the beauty and functionality of a well-designed display cabinet.

So, *bo jio* (don't say I didn't invite), go forth and measure with confidence!

Pro Tips for DIY Success

```html

So, you're thinking of sprucing up your home with a new display cabinet, eh? Maybe you’re a first-time homeowner setting up your BTO, or perhaps you're just looking to give your living space a fresh, new look. Either way, getting the right display cabinet door size is crucial. Trust me, a door that doesn't fit properly can be a real headache. Imagine all your precious collectibles gathering dust because the door's got gaps! Not a good look, right?

This guide is here to help you measure those display cabinet doors like a pro, ensuring a perfect fit, and avoiding those frustrating DIY mishaps. We'll break it down step-by-step, so even if you're not exactly Bob the Builder, confirm can still do it one. Don't worry, it's not as daunting as it seems! We’ll also touch on different display cabinet door styles, so you can choose the one that best suits your taste and needs. After all, you want your display cabinet to look good and function perfectly. A bit of effort now can save you a whole lot of trouble later.

Understanding Display Cabinet Door Styles

Before you even think about measuring, it’s good to know the different types of display cabinet doors available. This knowledge will help you choose the right style for your home and understand how measurements might differ depending on the design. Plus, knowing your options is just… fun! Think of it like choosing between kopi-o and kopi-c – both are coffee, but the experience is totally different, right?

Here are a few common display cabinet door styles you might encounter:

  • Overlay Doors: These doors sit on top of the cabinet frame, covering the entire opening. They're popular because they offer a clean, modern look. Measuring for overlay doors involves determining the total area you want the door to cover.
  • Inset Doors: Inset doors, on the other hand, fit inside the cabinet frame, flush with the surrounding surface. They offer a more traditional, built-in appearance. Measuring for these requires precision to ensure a snug fit within the frame.
  • Partial Inset Doors: A hybrid of the two, partial inset doors sit partially inside the frame, leaving a small reveal. These offer a balance between modern and traditional aesthetics.
  • Glass Panel Doors: These doors feature a glass panel, allowing you to showcase your items while keeping them protected. The frame around the glass can be made of wood, metal, or other materials.
  • Sliding Doors: Ideal for tight spaces, sliding doors glide horizontally along tracks. They're a great option if you don't have enough room for a swinging door.

Each style has its own unique charm and measurement requirements. For example, overlay doors offer more flexibility in terms of slight measurement errors, while inset doors demand greater accuracy. In Singapore’s compact HDB flats and apartments, the bedroom often acts as a rest zone and more— a place for deep relaxation after long workdays, enjoy quiet time with a book, or even handle occasional remote work when required. It’s frequent for local residents to feel frustrated by arrangements that feel cramped, harsh overhead lights, or bulky storage that reduces usable area, making the room feel more functional than relaxing. That’s where thoughtful singapore mattress store really shines—it centres around clever spatial solutions, soothing neutral tones, space-saving furniture, and ambient and layered lighting to create a restorative haven that maximises comfort while maintaining a clean, open feel. SUDDENLY the bedroom turns into the place you genuinely anticipate at the end of the day, helping you unwind faster, sleep deeper, and start mornings feeling revitalised for whatever the next day brings. Sites such as Wondrous La Vie provide tons of real-life examples and seamless introductions to professionals skilled in these practical yet beautiful Singapore-style bedroom makeovers.. Consider your available space, desired aesthetic, and the type of items you'll be displaying when choosing a style. Think about how the door will open and close – will it swing outwards, slide to the side, or fold inwards? These considerations will influence the measurements you need to take. Now, let's get to the nitty-gritty of measuring!

Essential Tools for Accurate Measurement

Okay, before we dive into the measuring process, let's gather our tools. Having the right equipment is half the battle won, like having the right ingredients before you start cooking. Imagine trying to bake a cake without flour – confirm cannot one, right? Same goes for measuring display cabinet doors!

Here's what you'll need:

  • Measuring Tape: A good quality measuring tape is essential. Choose one that's easy to read and extends far enough to cover the entire cabinet opening. Avoid flimsy tapes that can bend or stretch, as these can lead to inaccurate measurements.
  • Pencil: You'll need a pencil to mark your measurements. A regular pencil is fine, but a mechanical pencil with a fine tip can provide greater precision.
  • Paper or Notebook: Keep a notepad handy to jot down your measurements. It's easy to forget numbers, especially if you're dealing with multiple doors or complex dimensions.
  • Ruler or Straight Edge: A ruler or straight edge can be helpful for drawing straight lines and verifying measurements. It's especially useful when measuring the width of narrow frames or edges.
  • Level: A level is crucial for ensuring that your cabinet frame is perfectly level. Uneven frames can throw off your measurements and result in doors that don't align properly.
  • Calculator: A calculator can be handy for adding or subtracting measurements, especially when calculating clearances or overlaps. Your phone calculator will do just fine!

Optional but helpful tools include a digital measuring tool for extra precision, and a helper to hold the measuring tape or level. With these tools in hand, you're ready to tackle the measuring process with confidence. Remember, accuracy is key here – a few millimeters can make a big difference in the final fit. So, take your time, double-check your measurements, and don't be afraid to ask for help if you need it. Steady lah, you got this!

Step-by-Step Guide to Measuring Your Cabinet Door

Alright, let's get down to business! Measuring your display cabinet door might seem intimidating, but trust me, it's totally manageable if you follow these steps carefully. Think of it like following a recipe – if you stick to the instructions, you'll end up with a delicious dish (or in this case, a perfectly fitting door!).

  1. Measure the Opening Width: Start by measuring the width of the cabinet opening where the door will be installed. Measure from the inside edge of one side of the frame to the inside edge of the other side. Make sure to measure at the top, middle, and bottom of the opening, as the width might vary slightly. Use the smallest measurement as your base width.
  2. Measure the Opening Height: Next, measure the height of the opening. Measure from the inside top edge of the frame to the inside bottom edge. Again, measure at the left, center, and right of the opening, and use the smallest measurement as your base height.
  3. Determine Overlay or Inset: Decide whether you want an overlay or inset door. This will affect how you adjust your measurements. For overlay doors, you'll add to the base width and height to determine the door size. For inset doors, you'll subtract from the base width and height to ensure a snug fit.
  4. Calculate Overlay Dimensions (if applicable): If you're opting for overlay doors, determine how much you want the door to overlap the frame on each side. A common overlap is 1/2 inch to 1 inch on each side. Add twice the desired overlap to both the base width and base height to get the final door dimensions. For example, if your base width is 24 inches and you want a 1/2 inch overlap on each side, your door width would be 25 inches (24 + 0.5 + 0.5).
  5. Calculate Inset Dimensions (if applicable): For inset doors, you'll need to subtract a small amount from the base width and height to allow for clearance. A typical clearance is 1/16 inch to 1/8 inch on each side. Subtract twice the desired clearance from both the base width and base height to get the final door dimensions. For example, if your base width is 24 inches and you want a 1/16 inch clearance on each side, your door width would be 23 7/8 inches (24 - 1/16 - 1/16).
  6. Double-Check Your Measurements: Before you finalize your door order, double-check all your measurements. It's always a good idea to have someone else verify your measurements as well. A fresh pair of eyes can often catch mistakes you might have missed.
  7. Account for Hinges: Consider the type of hinges you'll be using and how they will affect the door placement. Some hinges require specific clearances or cutouts. Consult the hinge manufacturer's instructions for detailed specifications.

Remember, precision is key here. Take your time, measure carefully, and don't be afraid to ask for help if you're unsure about anything. Getting the measurements right is crucial for a successful DIY project. Now, let's move on to some pro tips to ensure a perfect fit!

Additional Tips for Ensuring a Perfect Fit

So, you've got your measurements, and you're feeling pretty good about yourself. But before you rush off to order your display cabinet door, let's go through some extra tips to make absolutely sure everything fits like a glove. Think of these as the secret ingredients that take your dish (or door!) from good to amazing!

  • Dealing with Uneven Cabinet Frames: Older homes, like some of those charming but slightly wonky shophouses, often have uneven walls and frames. If your cabinet frame isn't perfectly square, you'll need to account for this when measuring. Use a level to check the frame for squareness. If it's out of square, measure the diagonal dimensions of the opening. If the diagonals are different, the frame isn't square. You might need to order a door that's slightly larger than the opening and then trim it to fit. Alternatively, you can use shims to level the frame before installing the door.
  • Using Shims for Alignment: Shims are thin pieces of wood or plastic that can be used to adjust the alignment of the door after installation. They're especially useful if your cabinet frame is slightly warped or if the floor isn't perfectly level. Insert shims behind the hinges or along the edges of the frame to fine-tune the door's position.
  • Consider the Material: The material of your display cabinet door can also affect the fit. Wood doors, for example, can expand or contract with changes in humidity. If you live in a humid climate like Singapore, you might want to choose a material that's less susceptible to moisture, such as MDF or plywood. Alternatively, you can apply a sealant or finish to protect the wood from moisture.
  • Test Fit Before Final Installation: Before you permanently attach the hinges and install the door, do a test fit.

Check our other pages :

Frequently Asked Questions


Begin by measuring the existing openings height and width using a measuring tape, ensuring accuracy to the nearest millimeter or sixteenth of an inch.
Typically, subtract a small amount (e.g., 2-3mm) from both the height and width of the opening to allow for necessary gaps around the door for smooth operation.
Yes, measuring the old doors can provide a good starting point, but always verify against the cabinet opening itself to account for any warping or shifting over time.
Youll need a measuring tape, a pencil for marking dimensions, and potentially a level to ensure the cabinet opening is square.
For overlay doors, measure the opening and then add the desired overlay amount (how much the door will cover the cabinet frame) to both the height and width.
Measure the height and width at multiple points (top, middle, bottom, and sides) and use the smallest measurements to ensure the door will fit within the tightest area.
Consider moisture-resistant materials like solid surface, treated wood, or glass with aluminum frames to withstand Singapores humidity and prevent warping or damage.
Many furniture retailers and carpentry services in Singapore offer customizable display cabinet doors to fit specific dimensions and design preferences, catering to the needs of homeowners and BTO flat owners.